
Sound treatment is more than foam panels
Many people starting a home studio setup think acoustic treatment means gluing foam panels to the walls. That’s a common starting point, but it’s rarely the whole story. Simply slapping up some cheap foam often addresses surface-level reflections without tackling the underlying acoustic problems. In 2026, we have a much better understanding of how sound behaves in rooms and more effective tools to control it.
The truth is, effective acoustic treatment is about manipulating sound waves, not just blocking them. It’s about reducing unwanted reflections, smoothing out frequency response, and creating a space where you can accurately hear what you’re recording and mixing. Often, the goal isn’t complete soundproofing – keeping all sound in or out – but rather improving the sound within the room itself. This is especially important for audio recording tips and achieving a professional sound.
We’ll move past the quick fixes and explore the principles and products that will give you a real acoustic advantage. This means looking at absorption, diffusion, and bass management, and understanding how they work together to create a balanced and accurate listening environment. A solid foundation in these concepts will set you up for success with your home recording studio.
How room modes mess with your frequencies
Every room has acoustic characteristics determined by its dimensions. These dimensions create what we call room modes, or standing waves. Imagine a guitar string vibrating; certain frequencies resonate more strongly than others. Room modes are similar – they’re frequencies that build up in certain areas of the room, creating peaks and dips in the frequency response. These peaks and nulls can seriously color your recordings and mixes, making it hard to judge what you’re actually hearing.
The size and shape of your room dramatically impact which frequencies are affected. Smaller rooms tend to have more pronounced modes at lower frequencies, making bass control particularly challenging. Rectangular rooms are more prone to strong modes than irregularly shaped rooms. Understanding these relationships is crucial for targeted treatment. You don’t want to be boosting or cutting frequencies unnecessarily because of a room’s natural resonances.
These standing waves don't just affect low frequencies either. They can occur across the entire spectrum. A peak at 2kHz might make cymbals sound harsh, while a null at 100Hz could leave your kick drum sounding weak. Identifying these problem areas – often through acoustic measurements – is the first step toward effective treatment. While expensive software exists, even simple tests like playing sine waves and walking around the room can reveal noticeable variations in volume.
Don't get bogged down in complex calculations. The key takeaway is that room modes exist, they affect the sound you hear, and understanding their influence is essential for making informed treatment decisions. Ignoring them means you’re mixing and recording with an inaccurate sonic picture.
- Room Modes: Standing waves created by room dimensions.
- Frequency Response: The range of frequencies a room reproduces.
- Peaks & Nulls: Amplified and diminished frequencies due to room modes.
Using absorption to stop reflections
Absorption is the process of converting sound energy into heat, reducing reflections and reverberation. This is the most common type of acoustic treatment, and it’s particularly effective at controlling mid and high frequencies. Common absorptive materials include fiberglass, mineral wool, and acoustic foam. Fiberglass and mineral wool generally offer superior performance per inch of thickness compared to acoustic foam.
NRC (Noise Reduction Coefficient) is a common metric used to measure a material’s absorptive ability. It ranges from 0 to 1, with 1 representing perfect absorption. However, NRC is an average across a limited frequency range, and it doesn’t tell the whole story. A panel with a high NRC at 1kHz might do very little at 100Hz. That’s why thickness is so important – thicker materials absorb lower frequencies more effectively. A 2-inch panel will absorb much less low end than a 4-inch panel.
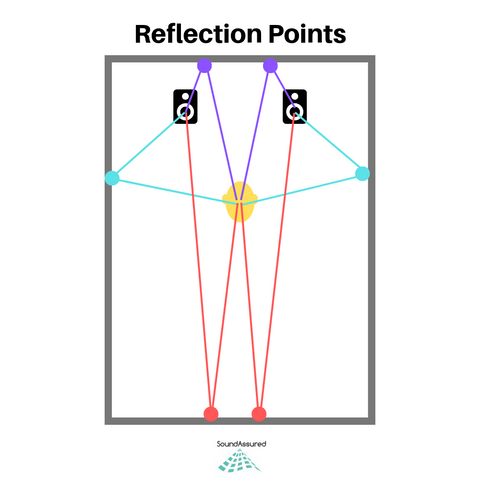
Proper placement is just as important as the material itself. First reflection points – the spots on the walls, ceiling, and floor where sound first bounces off on its way from the source to your ears – are prime locations for absorptive panels. Corners are also crucial, as they tend to accumulate low-frequency energy. Fabric-wrapped panels are a popular choice for aesthetic reasons, but ensure the fabric is acoustically transparent and doesn't impede absorption.
While acoustic foam is often the cheapest option, its performance is limited, especially at lower frequencies. It's best suited for smaller rooms or for tackling high-frequency reflections. For serious home studio applications, investing in fiberglass or mineral wool panels will yield significantly better results. Consider using a combination of materials and thicknesses to address a wider range of frequencies.
Diffusion: Scattering Sound Energy
Unlike absorption, which removes sound energy, diffusion scatters it. Diffusers break up sound waves, spreading them out in time and space. This creates a more natural-sounding environment by preventing strong reflections and flutter echoes. A room that’s overly absorptive can sound dead and lifeless; diffusion helps to restore some sense of ambience and spaciousness.
There are several types of diffusers, each with its own characteristics. Quadratic residue diffusers (QRDs) are based on mathematical sequences and offer broad-spectrum diffusion. Skyline diffusers use wells of varying depths to scatter sound, and are often easier to build DIY. Polycylindrical diffusers (like curved surfaces) are effective at scattering sound in multiple directions. The best choice depends on your room’s size, shape, and the frequencies you’re trying to control.
It’s important to understand that diffusion isn’t about eliminating reflections entirely. It's about making them less focused and more even. A well-diffused room will sound more open and natural, while still maintaining clarity and definition. DIY diffuser options are available for those who are handy, but commercially-made diffusers often offer more predictable and consistent performance.
Think of diffusion as adding texture to the sound. It prevents the harshness of direct reflections while still preserving some of the room’s natural character.
The headache of low-frequency bass traps
Bass frequencies are the most challenging to control because of their long wavelengths. They can easily wrap around obstacles and accumulate in corners and along walls. This leads to uneven bass response and muddy mixes. Bass traps are specifically designed to absorb low-frequency energy, reducing these problems.
There are several types of bass traps. Corner traps are the most common, placed in the corners of the room where bass energy tends to build up. Membrane traps use a flexible membrane to absorb low frequencies, while Helmholtz resonators are tuned to specific frequencies. Each type has its strengths and weaknesses, and the best choice depends on your room’s specific needs.
Effective bass absorption requires significant thickness. A typical bass trap might be 4-8 inches thick, and even that may not be enough to absorb the lowest frequencies. Placing bass traps in corners is the most effective strategy, as it maximizes their surface area and allows them to intercept more bass energy. Superchunk bass traps, made from stacked fiberglass or mineral wool, are a popular DIY option.
Don’t underestimate the importance of bass management. Even a small improvement in bass control can have a dramatic impact on the clarity and accuracy of your recordings and mixes. It’s often the most overlooked aspect of acoustic treatment, but it’s arguably the most important.
2026's Standout Products & Innovations
The acoustic treatment market is constantly evolving. In late 2025 and early 2026, several products and innovations stand out. GIK Acoustics continues to be a leader, with their 242 Acoustic Panels offering excellent performance and a range of fabric options. Their Monster Bass Traps are particularly effective at controlling low frequencies. Prices for a set of four 242 panels start around $600.
Vicoustic is another strong contender, known for their VMT (Vic Modular Tiles) system. These modular tiles offer a flexible and aesthetically pleasing solution for acoustic treatment. They're a bit more expensive, with a starter kit costing around $800, but offer a high degree of customization. A newer innovation is the use of recycled materials in acoustic panels. Companies like Reclaim Sound are creating panels from recycled denim and other materials, offering a sustainable and eco-friendly option.
For DIY enthusiasts, Owens Corning 703 fiberglass board remains a popular and cost-effective material. However, be sure to handle it with appropriate safety precautions (gloves, mask, and eye protection). A notable trend is the increasing availability of pre-fabricated bass traps and diffusers that are easy to install. These offer a good balance of performance and convenience. The Auralex SonoCube is a good example of this, costing around $150 each.
Finally, several companies are now offering room acoustic analysis services that use software to predict the acoustic behavior of your room and recommend specific treatment solutions. These services can be a valuable investment, especially for complex spaces.
- GIK Acoustics 242 panels cost about $600 for a four-pack and handle mid-range reflections well.
- Vicoustic VMT systems are modular and look better than industrial foam, though the $800 starter price is steep.
- Reclaim Sound Panels: Recycled material options.
- Auralex SonoCube: $150 each.
- Owens Corning 703: Cost-effective DIY material.
Home Studio Acoustic Treatment: A Comparative Overview - 2026
| Product Name | Type | Key Features | Price Range | Best For |
|---|---|---|---|---|
| Gik Acoustics 242 Acoustic Panel | Absorber | Broadband absorption, multiple fabric options, easy mounting | Moderate | Small to Medium Rooms, vocal booths, controlling early reflections |
| RealTraps Diffusor | Diffuser | Splayed design for even diffusion, minimizes comb filtering, wood construction | Moderate to High | Medium to Large Rooms, rear wall treatment, creating a spacious sound |
| Auralex Acoustics T-Fusor | Diffuser | Pyramid shape for scattering sound, affordable, lightweight | Low to Moderate | Small to Medium Rooms, controlling flutter echo, adding diffusion without significant absorption |
| Primacoustic Broadway 5550 Bass Trap | Bass Trap | Superchunk design for low-frequency absorption, corner placement, effective at reducing room modes | Moderate to High | Corners of Medium to Large Rooms, controlling bass buildup, improving clarity |
| Foam Factory Melamine Foam Panels | Absorber | High noise reduction coefficient (NRC), customizable sizes, cost-effective | Low | Small Rooms, vocal booths, treating first reflections on a budget |
| Vicoustic Vixagon | Absorber/Diffuser | Modular hexagonal design, combines absorption and diffusion, visually appealing | Moderate to High | Medium to Large Rooms, versatile treatment for walls and ceilings, aesthetic-focused studios |
| GIK Acoustics Monster Bass Trap | Bass Trap | Large surface area for maximum bass absorption, effective in corners, multiple fabric options | High | Large Rooms with significant bass issues, professional studios, critical listening environments |
Qualitative comparison based on the article research brief. Confirm current product details in the official docs before making implementation choices.

No comments yet. Be the first to share your thoughts!